Can I get an amen on how easy it is to become obsessed with jewelers files! There are so many too choose from its simply amazing. I know its the tool I use the most and I am assuming you guys put a lot of file time in too.
In the beginning I was really into fine cut files, as high a number as I could get them. My local jewelry supply shop only sells Grobet files and so that's what I bought. The smoothest files I could get from them was a flat hand file in 3 and a half round (not half round ring) in a 4. I had high hopes of using that Grobet flat hand #3 file a lot but as it turned out, I rarely used it at all. That particular file lost its edgy cut feel right away and I was really disappointed. You know what I mean, that brand new sharp and crisp feel they have? I didn't know what happened but I didn't like it.
I then found the company that I have bought the most files from, Friedrich Dick. Their files retain that sharp, crisp feel that I love for a long time, in fact, they still have it. I know over time files wear down depending on frequency of use, how you use it and where you store it. Don't store them near your pickle or anything that can rust or damage them. Also, don't put pressure on the back stroke, it pushes the teeth over and can hinder the cut. I know with wood files it cleans the wood out of the teeth, but don't do it with metal files.
I recently bought a Friedrich Dick Half Round Ring File in a #3 cut and I find myself using it a lot, but not really for the inside of rings. Do you use a half round ring file on the inside of rings much? I find myself using sandpaper cartridges with my flex shaft and not the file. I am looking to buy a half round needle file, a quality one, not those garbage ones we know so well. If an entire set cost $12.00, its not good. :)
As my filing adventures continue, I will write more, thank you!

I am sharing my experience as a Silversmith and aspiring Jeweler.
Tuesday, June 3, 2014

Monday, March 3, 2014
My Jewelers Torch Setup
Finally! For over two years I have been using a plumbers torch, I
attached a picture of it. While it did work well for me, I always wanted
a real jewelers torch. The plumbers torch doesn't get hot enough to size
a ring that you are using thermo gel on or any type of cooling system.
Almost a year ago I bought a Hoke torch and O2 tank from a retiring
jeweler for $30.00. It came with no regulators and it took me 8 months
to get a propane regulator, the bbq tank 20lb type. It was a lot of
driving and blank stares from people, it was more difficult to get that propane regulator than I thought it would be.
I went to a place called Mutual Propane and bought a nice little red regulator, image also attached. The attachments to the Hoke torch are friction type and hose clamp as you know. I ended up having to fill the O2 tank and after all the planets aligned, I had a working usable torch! The Hoke torch, although heavy, puts a really nice flame out. My joy quickly subsided when I realized a flashback could happen and if it did, I wasn't at all protected from it.
Two weeks ago that same retiring jeweler called me from his home and said he had more stuff to sell and I was glad to hear from him after all this time. I ended up buying a used smith little torch with two replacement hoses and a bunch of gravers for $70.00. Its an honor to have tools in my bench that a real jeweler used, I am still so enamored by this trade. I finally had in my hands a smith little torch, it was joyous indeed. Those torches and hoses are so light!
I ended up putting the new hoses on the smith little torch and I ordered a proper propane regulator from a notable jewelry supply shop with two flashback arrestors! There is plenty of information out there on what happens when a flashback occurs on the second floor of your house with your wife, dog and cat nearby, none of it is pretty.
I highly recommend using flashback arrestors, they are cheap compared to what could happen. I will upload a picture of the new setup tomorrow.
Taking your time to get set up correctly is definitely worth the safety and piece of mind. You can do so much more with an oxygen and fuel torch system, its hotter and has much better heat accuracy.


I went to a place called Mutual Propane and bought a nice little red regulator, image also attached. The attachments to the Hoke torch are friction type and hose clamp as you know. I ended up having to fill the O2 tank and after all the planets aligned, I had a working usable torch! The Hoke torch, although heavy, puts a really nice flame out. My joy quickly subsided when I realized a flashback could happen and if it did, I wasn't at all protected from it.
Two weeks ago that same retiring jeweler called me from his home and said he had more stuff to sell and I was glad to hear from him after all this time. I ended up buying a used smith little torch with two replacement hoses and a bunch of gravers for $70.00. Its an honor to have tools in my bench that a real jeweler used, I am still so enamored by this trade. I finally had in my hands a smith little torch, it was joyous indeed. Those torches and hoses are so light!
I ended up putting the new hoses on the smith little torch and I ordered a proper propane regulator from a notable jewelry supply shop with two flashback arrestors! There is plenty of information out there on what happens when a flashback occurs on the second floor of your house with your wife, dog and cat nearby, none of it is pretty.
I highly recommend using flashback arrestors, they are cheap compared to what could happen. I will upload a picture of the new setup tomorrow.
Taking your time to get set up correctly is definitely worth the safety and piece of mind. You can do so much more with an oxygen and fuel torch system, its hotter and has much better heat accuracy.
Wednesday, February 12, 2014
Making Gold Jewelry
I very much like working with gold, it has different properties and characteristics than silver. I find it easier to work with than silver. Its a bit harder to shape and bend but its easier to sand, blend and polish, at least that's what I have found.
Soldering gold is a bit shocking at first as the solder is initially really yellow in color, dont worry you didnt ruin your piece. :) It cleans up like a champ and turns into a warm and lustrous glow after you polish it. It turns a glowy red when you are soldering it, unlike silver. Its a fun and frightening endeavor, but one that is so rewarding! My advice is to go slow, think about what you are putting your torch too and if stones are in it, how are you protecting them. If there are stones in the ring, don't quench it, just let it air cool so you dont shock anything into cracking, been there, done that.
My first experience with gold was Shannons wedding ring. The original jeweler who sized it didn't use enough solder and the seam just broke one day while she was wearing it. She handed it to me and so I bought some 14K yellow gold solder from Rio and got to it. I wimped out the first 5 attempts because I was afraid of ruining the entire ring. Gold turns orange at soldering temp and it scared me :) I ended up soldering it and it wasn't pretty. I used too much solder and didn't want to file it too much as to wear away the design on the back. Its actually pretty straightforward and there is nothing to be afraid of, just go for it!
I am slowly adding gold to our Etsy shop and I just love working with it. It is a quite a bit more expensive than silver, thats just something we need to deal with. On the flip side you can make some decent profit on gold items and gold is such an honorable metal, isn't it?
Soldering gold is a bit shocking at first as the solder is initially really yellow in color, dont worry you didnt ruin your piece. :) It cleans up like a champ and turns into a warm and lustrous glow after you polish it. It turns a glowy red when you are soldering it, unlike silver. Its a fun and frightening endeavor, but one that is so rewarding! My advice is to go slow, think about what you are putting your torch too and if stones are in it, how are you protecting them. If there are stones in the ring, don't quench it, just let it air cool so you dont shock anything into cracking, been there, done that.
My first experience with gold was Shannons wedding ring. The original jeweler who sized it didn't use enough solder and the seam just broke one day while she was wearing it. She handed it to me and so I bought some 14K yellow gold solder from Rio and got to it. I wimped out the first 5 attempts because I was afraid of ruining the entire ring. Gold turns orange at soldering temp and it scared me :) I ended up soldering it and it wasn't pretty. I used too much solder and didn't want to file it too much as to wear away the design on the back. Its actually pretty straightforward and there is nothing to be afraid of, just go for it!
I am slowly adding gold to our Etsy shop and I just love working with it. It is a quite a bit more expensive than silver, thats just something we need to deal with. On the flip side you can make some decent profit on gold items and gold is such an honorable metal, isn't it?
Monday, February 10, 2014
My New Ultrasonic!
Well its new to me anyway :) I have been in the market for an industry respected ultrasonic and I came to the conclusion that they are expensive! Harbor Freight sells one for $86.00 on sale but from what I have learned, they don't last very long. Do you buy the cheaper version, baby it and hope it holds up? Or do you invest your money in something that is tried and true to work well and last?
The ultrasonic I was using was one of those home use jewelry spa types, you know the type. While it did vibrate and have heat, it was small, old, cracked and didn't do what I needed it to. I always had to toothbrush the polishing compound out of the recesses of my rings and pendants and it kind of defeats the whole purpose of having an ultrasonic in the first place.
I went on Craigslist and did my search and a Quantrex LR140 came up for $150.00. I ended up getting it for $125.00 and I feel like I got a good deal because its almost new. It has the basket and lid, but I am going to do away with the basket and use the little bar that goes across the top of it. I think the basket absorbs too much of the vibration.
I find myself needlessly polishing just so I can test it out. :) I am glad I didnt settle for a cheaper ultrasonic, not that they cant do an awesome job, just I have never had any luck with cheaper vibrating machines.

The ultrasonic I was using was one of those home use jewelry spa types, you know the type. While it did vibrate and have heat, it was small, old, cracked and didn't do what I needed it to. I always had to toothbrush the polishing compound out of the recesses of my rings and pendants and it kind of defeats the whole purpose of having an ultrasonic in the first place.
I went on Craigslist and did my search and a Quantrex LR140 came up for $150.00. I ended up getting it for $125.00 and I feel like I got a good deal because its almost new. It has the basket and lid, but I am going to do away with the basket and use the little bar that goes across the top of it. I think the basket absorbs too much of the vibration.
I find myself needlessly polishing just so I can test it out. :) I am glad I didnt settle for a cheaper ultrasonic, not that they cant do an awesome job, just I have never had any luck with cheaper vibrating machines.
Monday, January 6, 2014
I Learned a Valuable Soldering Lesson.
I will start this post out with *Sigh*. You know they kind of sigh when you already knew the correct way, then strayed away then came back to it? Too me, soldering is a lot like poker, you can learn how to do it in an hour but it takes a lifetime to become good at it.
It all started with the wide rings I make and sell on Etsy. These rings are up to 1 and 1/4" wide, beastly right? I usually make them around the 3/4" width but sometimes I get custom requests. One of the wide rings I make is a gigantic half round ring shank with the middle being 2mm thick. The only way you are forming that into a ring is with pliers, there is not a lot of manipulation to be done with your hands. So I get the seam closed and almost light tight, then run a saw blade through it like we all do. You have to be very careful that your saw blade doesn't stray off course or you will be doing a lot of filing to fix it and downsizing the ring inadvertently.
I should have been soldering the seam like I always had been, with the correct amount of hard solder. I used to only use hard solder because it has the highest silver content and keeps its color the longest. What do I do instead of chip soldering the right amount? I stick solder easy flow and flood the seam with enough solder to fill any gaps that I was unable to file flat. Its so disappointing that I went that route instead of doing it right.
The problem with easy flow solder is it turns black way before the sterling does and you can see the seam in as early as a week or two I recently found out. I know this because a lady sent one back to be re-sized and I was horrified and embarrassed when I opened the return shipment. Not only was I able to see my line where I soldered it, I also saw little black pools of where I left solder on the ring. I couldn't see it at the time because I used 400 grit sandpaper then took it to the polishing wheel. Everything looked perfectly shiny when I sent it off. I am grateful that I hadn't been doing that wrong technique on very many rings. I know better than that, that's the worst part.
This whole experience made me think, can we use Argentium solder on sterling silver to prevent the seam from showing up eventually? Its not a problem on regular sized rings but for these wide bands, everything shows up. Or if I am soldering and sanding, polishing and buffing properly, should a line never show up no matter how much time passes?
It all started with the wide rings I make and sell on Etsy. These rings are up to 1 and 1/4" wide, beastly right? I usually make them around the 3/4" width but sometimes I get custom requests. One of the wide rings I make is a gigantic half round ring shank with the middle being 2mm thick. The only way you are forming that into a ring is with pliers, there is not a lot of manipulation to be done with your hands. So I get the seam closed and almost light tight, then run a saw blade through it like we all do. You have to be very careful that your saw blade doesn't stray off course or you will be doing a lot of filing to fix it and downsizing the ring inadvertently.
I should have been soldering the seam like I always had been, with the correct amount of hard solder. I used to only use hard solder because it has the highest silver content and keeps its color the longest. What do I do instead of chip soldering the right amount? I stick solder easy flow and flood the seam with enough solder to fill any gaps that I was unable to file flat. Its so disappointing that I went that route instead of doing it right.
The problem with easy flow solder is it turns black way before the sterling does and you can see the seam in as early as a week or two I recently found out. I know this because a lady sent one back to be re-sized and I was horrified and embarrassed when I opened the return shipment. Not only was I able to see my line where I soldered it, I also saw little black pools of where I left solder on the ring. I couldn't see it at the time because I used 400 grit sandpaper then took it to the polishing wheel. Everything looked perfectly shiny when I sent it off. I am grateful that I hadn't been doing that wrong technique on very many rings. I know better than that, that's the worst part.
This whole experience made me think, can we use Argentium solder on sterling silver to prevent the seam from showing up eventually? Its not a problem on regular sized rings but for these wide bands, everything shows up. Or if I am soldering and sanding, polishing and buffing properly, should a line never show up no matter how much time passes?
Monday, September 30, 2013
Free Sterling Silver Toe Ring with $5.00 Minimum Purchase for a Limited Time!
I will be giving away a free sterling silver toe ring with a $5.00 minimum purchase from our Etsy shop: https://www.etsy.com/shop/Lovethebugs
Its a great toe ring and will make a fantastic Christmas gift for someone :)
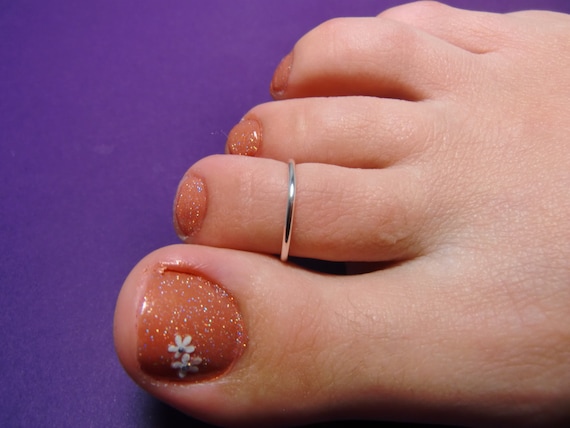
Its a great toe ring and will make a fantastic Christmas gift for someone :)
Thursday, September 12, 2013
Polishing Jewelry with A Jewelers Polishing Machine
I am so surprised at the lack of videos and instruction on polishing with the jewelers polishing machine. I have scoured youtube looking for teaching on it and really nothing gave me confidence on the polishing wheel.
I sell sterling silver cuffs using 6 inch by 1 inch sheets of metal. I am always grateful when a customer orders one with a satin finish and my heart sinks when they want high polish. On a ring, its easy to make it shine because there aren't huge flat spots to get shiny. With that cuff, there are 6 square inches of flat area that has to be polished. It really makes me think about any and every wheel, emery paper or anything else that touches that cuff before the polishing wheel. I want to mark it up as little as possible with still doing the best job that I can.
It seems like I either end up barely touching it at all with prefinish work, or I completely sand the cuff. Either way you end up with an unfinished piece staring at the buffing wheels spinning round and round. So what do you do?
I haven't had good success with tripoli on sterling silver. I don't know if its too gritty or what, but it always makes it worse for me. Even if I use very light pressure when I am polishing with it, it still gouges on me. I wouldn't even dream of using one of those hard yellow buffs, you know which ones I mean? Those things make craters and valleys in silver, it looks like the grand canyon. :)
I will look into less powerful pre finish polishing compounds because I still think there is something worthwhile in a step between the bench and final polishes.
I started with red rouge and honestly, I don't love it. I know a few jewelers who pretty much only use that and they get great results, but they are great jewelers and I am not-yet! I use and love Zam, I love that stuff because it works so well. I never gave it credit for a final polish because it is a cut and polish compound and you can shape soft stones with it. Zam can leave a good final polish on sterling silver, you just need to be patient.
I recently added a final High-Luster polishing compound to my arsenal called LUXI Orange. I have been selling quite a bit of Wide Sterling Silver Rings, they are 20 gauge and 3/4" wide and really fun to make! So I pretty much go from 400 grit sand paper to 600 grit sand paper to Zam and finally finish with a Fine All Finishing 3" Buff and LUXI High Luster Polishing Compound. I get really good results with that combination so far. Plus, I have confidence at the polishing wheel and that really goes a long way when you have a bunch of orders to do.
I will write more on polishing in the near future, we really need to help each other learn and figure this out. Thank you so much for reading, you honor me by doing so! Tommy
I sell sterling silver cuffs using 6 inch by 1 inch sheets of metal. I am always grateful when a customer orders one with a satin finish and my heart sinks when they want high polish. On a ring, its easy to make it shine because there aren't huge flat spots to get shiny. With that cuff, there are 6 square inches of flat area that has to be polished. It really makes me think about any and every wheel, emery paper or anything else that touches that cuff before the polishing wheel. I want to mark it up as little as possible with still doing the best job that I can.
It seems like I either end up barely touching it at all with prefinish work, or I completely sand the cuff. Either way you end up with an unfinished piece staring at the buffing wheels spinning round and round. So what do you do?
I haven't had good success with tripoli on sterling silver. I don't know if its too gritty or what, but it always makes it worse for me. Even if I use very light pressure when I am polishing with it, it still gouges on me. I wouldn't even dream of using one of those hard yellow buffs, you know which ones I mean? Those things make craters and valleys in silver, it looks like the grand canyon. :)
I will look into less powerful pre finish polishing compounds because I still think there is something worthwhile in a step between the bench and final polishes.
I started with red rouge and honestly, I don't love it. I know a few jewelers who pretty much only use that and they get great results, but they are great jewelers and I am not-yet! I use and love Zam, I love that stuff because it works so well. I never gave it credit for a final polish because it is a cut and polish compound and you can shape soft stones with it. Zam can leave a good final polish on sterling silver, you just need to be patient.
I recently added a final High-Luster polishing compound to my arsenal called LUXI Orange. I have been selling quite a bit of Wide Sterling Silver Rings, they are 20 gauge and 3/4" wide and really fun to make! So I pretty much go from 400 grit sand paper to 600 grit sand paper to Zam and finally finish with a Fine All Finishing 3" Buff and LUXI High Luster Polishing Compound. I get really good results with that combination so far. Plus, I have confidence at the polishing wheel and that really goes a long way when you have a bunch of orders to do.
I will write more on polishing in the near future, we really need to help each other learn and figure this out. Thank you so much for reading, you honor me by doing so! Tommy
Thursday, September 5, 2013
Making a Super Wide Sterling Silver Ring
I love making this Wide Sterling Ring because its so big and beautiful! I use 20 gauge sterling silver sheet and saw out the form of the ring. We have had some great success with this ring, its so much fun and it looks good on your finger. I prefer making it in satin, that look seems to compliment it to me.
Wide rings are a little more challenging because you have a longer seam to close properly. Just take your time and get it right. If you need to run your saw blade through the seam to get it tight, then do that.
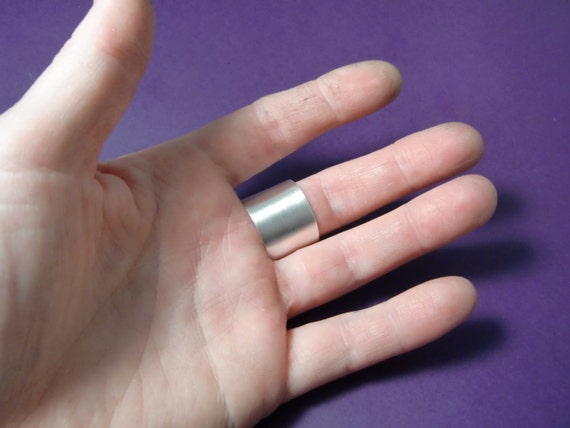
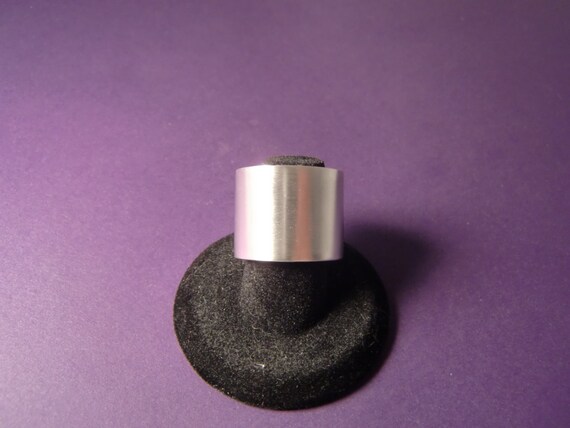
Wide rings are a little more challenging because you have a longer seam to close properly. Just take your time and get it right. If you need to run your saw blade through the seam to get it tight, then do that.
Moved To Corona, Ca.
Shannon and I just got done moving to Corona, Ca and let me tell you... it was rough! You know how moving is, its taxing, stressful, emotional including depressing :) We have been getting some great orders from Etsy though and we got most of them while the bench was in pieces inside a U-Haul truck, isn't that so life? I am so very grateful for the orders though, I pray they never stop coming.
Now the bench is set up and I am getting used to making jewelry in my own private room which is good and bad. Good because I can make a hammered sterling ring without bothering anyone and bad because I am not in close proximity to Shannon anymore :( I used to make jewelry sitting 4 feet from her, now its more like 24 feet.
I have been trying to do things that my older self will thank me for and buying our home has to be one of those, doesn't it? Anyways, if anyone reads this, thank you and God bless you! Tommy
Now the bench is set up and I am getting used to making jewelry in my own private room which is good and bad. Good because I can make a hammered sterling ring without bothering anyone and bad because I am not in close proximity to Shannon anymore :( I used to make jewelry sitting 4 feet from her, now its more like 24 feet.
I have been trying to do things that my older self will thank me for and buying our home has to be one of those, doesn't it? Anyways, if anyone reads this, thank you and God bless you! Tommy
Monday, July 15, 2013
Making Sterling Silver Toe Rings
I am absolutely loving making sterling silver toe rings! There are so many variations on them you can do. I have always made them with an open back, to make them one size fits all and it seems to be working well. I wouldn't expect people to know their toe rings sizes, I surely dont know mine :)
I am still figuring out how wide is too wide and how heavy is too heavy for a toe ring. I have been giving away free sterling toe rings with many orders lately. I just really love giving back to my customers, I appreciate them so much.
Here are the Sterling Toe Rings I have so far.: Sterling Silver Toe Rings
I am still figuring out how wide is too wide and how heavy is too heavy for a toe ring. I have been giving away free sterling toe rings with many orders lately. I just really love giving back to my customers, I appreciate them so much.
Here are the Sterling Toe Rings I have so far.: Sterling Silver Toe Rings
Monday, February 4, 2013
I Finished My GIA AJP Courses!
GIA offers some distance education courses for those of us who arent near their actual locations. They have quite a few different classes you can take, I chose the Accredited Jewelry Professional credential. The AJP consists of three different courses, Colored Stone Essentials, Diamond Essentials and Jewelry Essentials.
For me it was a huge learning experience as I don't have any formal training in any of the three courses. The world of colored stones is vast and although one course doesn't make you a master, it sure opens your eyes to whats out there. The diamond essentials course was packed full of vital information on diamonds, cut, color, clarity, carat weight - all good to know. The jewelry essentials course talked about all the different types of jewelry and the history of it, fascinating if you are in love with jewelry like I am.
I highly recommend looking into those courses, in total there were about $450.00. Let me tell you, it was well worth it and now I can put AJP after my name! Love it!

For me it was a huge learning experience as I don't have any formal training in any of the three courses. The world of colored stones is vast and although one course doesn't make you a master, it sure opens your eyes to whats out there. The diamond essentials course was packed full of vital information on diamonds, cut, color, clarity, carat weight - all good to know. The jewelry essentials course talked about all the different types of jewelry and the history of it, fascinating if you are in love with jewelry like I am.
I highly recommend looking into those courses, in total there were about $450.00. Let me tell you, it was well worth it and now I can put AJP after my name! Love it!

Thursday, December 20, 2012
The Value of YouTube and Learning To Silversmith
I know this wasnt possible to silversmiths and jewelers of years back, but we have YouTube now to help us learn this beautiful art. I cant tell you how many videos I have watched from masters who grace us with their videos. I consider myself lucky that a master silversmith or master jeweler would upload videos to instruct us with.
Doing even a simple search like "Making a Sterling Silver Ring" or "Creating a Bezel" yields many video results for us to choose from. I have seen many of them and there are still so many to go. Some of my favorite YouTube poster for jewelry making are: Vandyke Jewelers, 1soham1, Rio Grande, Vanessa Nicole Jewelers, The Desert Artist, Don Norris and so many more. I am extremely grateful that we have that wonderful resource to guide, teach and direct us.
I have learned most of what I know by watching masters on YouTube. Give it a try, do some searches and see what you can learn.
Doing even a simple search like "Making a Sterling Silver Ring" or "Creating a Bezel" yields many video results for us to choose from. I have seen many of them and there are still so many to go. Some of my favorite YouTube poster for jewelry making are: Vandyke Jewelers, 1soham1, Rio Grande, Vanessa Nicole Jewelers, The Desert Artist, Don Norris and so many more. I am extremely grateful that we have that wonderful resource to guide, teach and direct us.
I have learned most of what I know by watching masters on YouTube. Give it a try, do some searches and see what you can learn.
Friday, November 30, 2012
Silversmithing Torch
I found out right away that a jewelers or silversmiths torch is expensive. I am thinking I will go with the propane and oxygen set eventually. Acetylene and oxygen burns hotter but its super dirty, you have probably seen those paratroopers that it gives off before you add the oxygen.
Until I can invest hundreds of dollars for the torch, I am using a set up that costs about $12.00 :) I learned about this from a silversmith named Don Norris. You can find him on YouTube, he has some great instructional videos. Its basically a plumbers torch and I have to say, it works great! Its much hotter than the micro torches you use with butane and the tank lasts for months.
 This is the torch, you can get the head and tank from Home Depot in a set for around $12.00. I highly recommend buying a $2.00 slim propane bottle as its much easier to handle while you smith.
 Thats the one right there. I am right handed so I hold my torch in my left hand and do my find motor skill functions in my right hand. Enjoy!
Until I can invest hundreds of dollars for the torch, I am using a set up that costs about $12.00 :) I learned about this from a silversmith named Don Norris. You can find him on YouTube, he has some great instructional videos. Its basically a plumbers torch and I have to say, it works great! Its much hotter than the micro torches you use with butane and the tank lasts for months.
Thursday, November 29, 2012
Learning to Silversmith...
What an adventure it has been over the last year as I am learning to Silversmith. I have always been fascinated by Jewelers and the amazing work they do. Turning raw materials into one of a kind works of art that people wear. Completely transforming stone and metal into beautiful rings, necklaces, pendants, bracelets even flatware and household items.
What started me looking into silver was last year when it hit $50.00 an ounce on the stock exchange. Of course I didnt have an ounce of silver to my name and I lamented over that. I watched it everyday praying it would come down so I could swoop in and buy a bunch of it. It still hasn't come down to where the average was for the last 10 years, $6.00 an ounce, can you believe silver was ever only that much? Me either.
Last Christmas my wife talked to my sister and my sister got me a Silversmiths kit! I was so excited, it was basically a tackle box with tools in it. Jewelers tools I might add, tools I had no idea how to use or what they were. Shannon recognized them instantly as she had worked for a jeweler when she was in high school. That was all it took for me to go into full blown obsession with silversmithing and jewelry making, and it has been so much fun!
Our Etsy Jewelry Shop
What started me looking into silver was last year when it hit $50.00 an ounce on the stock exchange. Of course I didnt have an ounce of silver to my name and I lamented over that. I watched it everyday praying it would come down so I could swoop in and buy a bunch of it. It still hasn't come down to where the average was for the last 10 years, $6.00 an ounce, can you believe silver was ever only that much? Me either.
Last Christmas my wife talked to my sister and my sister got me a Silversmiths kit! I was so excited, it was basically a tackle box with tools in it. Jewelers tools I might add, tools I had no idea how to use or what they were. Shannon recognized them instantly as she had worked for a jeweler when she was in high school. That was all it took for me to go into full blown obsession with silversmithing and jewelry making, and it has been so much fun!
Our Etsy Jewelry Shop
Subscribe to:
Posts (Atom)